Many people have asked about the whirlpool/immersion chiller technique that I've described on the MoreBeer forum and on The Brewing Network show, so I thought I'd put up a page describing it. Before the details, let me knock out the most common questions first.
Doesn't a plate chiller or counter-flow chiller chill faster?
No. A good-sized immersion chiller has as much surface area as the best of those. The one I use has more surface area than a Therminator. The math is simple: the more surface area in contact with the wort, the faster you transfer heat. Flowing a little wort through a counter-flow or plate chiller at a time is actually less efficient, because that wort eventually reaches the temperature of the tap water and stops cooling. With the whirlpool method you're constantly exchanging cooled wort for hot wort across the entire chiller surface.
Doesn't a plate or counter-flow chiller reach a lower temperature?
No. No chiller can go lower than its cooling source. They all work by transferring heat from one liquid to another, so the wort only gets as cold as the coldest liquid. They're all the same in that regard.
Doesn't this use more water?
No, for the same reason none of them goes colder than another. You can waste water by running it at a higher volume than you need, but that's within your control.
I already own a counter-flow chiller. Why switch?
Several additional benefits:
- Improved hop aroma
- Reduced DMS
- Reduced cold break in the fermenter
- More precise control of the final temperature
The first three come from chilling the entire wort at once. With a counter-flow or plate chiller, the bulk of the wort sits near boiling while you chill a small stream, and sitting near boiling keeps isomerizing hop acids and driving off the volatile oils that good aroma depends on. Many people notice hop aroma drops when they switch from immersion to counter-flow; this is why. The whirlpool immersion chiller knocks enough heat off the entire wort in the first minute or two to retain that hop character. (If you're going to use a counter-flow or plate chiller, better buy yourself a hopback.)
The same applies to DMS. Lighter pilsner malts contain more SMM, which hydrolyzes to DMS during the boil. Some is driven off, but unless you boil 100 minutes or more, some SMM remains. The neat thing: below 140°F (60°C), the conversion of SMM to DMS all but stops. The whirlpool immersion chiller drops the wort below 140°F very quickly, so far less DMS forms, while counter-flow and plate chillers keep hydrolyzing SMM into DMS as the bulk sits near boiling.
You can also control temperature more precisely. Brewing a Belgian and want a warmer pitch? Watch the thermometer and stop there. Want lager temps? Recirculate ice water and you can get there too. And if you take it down to pitching temperature, you can leave all the cold break behind in the kettle, a real bonus for lager brewers.
Can I do this with my counter-flow or plate chiller?
Yes. Several people report good results running the device's output back into the kettle. You'll get less of a whirlpool effect, but the chilling should be just as good. No DMS and great hop character.
Are you selling these?
No, I have no financial interest in this at all. You can make it yourself fairly easily. The basic parts are an immersion chiller, a pump, and a hunk of tubing. I mention the specific products I own only in case you want to copy my setup exactly.
How does it work?
I've combined an immersion chiller and a whirlpool to rapidly cool the wort and leave the cold break behind. Moving the hot wort across the chiller coils cools it very quickly.
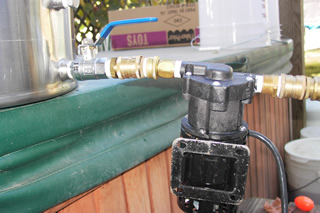
The basic setup: I put the immersion chiller in the kettle with 15 minutes left in the boil. I connect my pump to the kettle's spigot with a length of tubing, then run from the pump output through about two feet of silicone tubing (the kind MoreBeer sells with their systems). That's clamped to a piece of copper tubing with a gentle curve that goes under the surface of the wort, just inside the coils of the immersion chiller. The pump has been moving 170°F+ water during the sparge, but I run it a few minutes to recirculate the wort and heat-sanitize the setup.
When the boil is complete, I turn on the pump and the chilling water. The temperature drops more than 100°F in three minutes using one of the beefy Super Chillers MoreBeer sold: 50 feet of ½-inch copper, a huge amount of surface area. The rest of the drop (another 50°F or so) takes longer but is still as quick as any counter-flow I've used. I watch the thermometer until it reaches my pitch temperature, then turn off the water and pump and let everything settle about 20 minutes. That lets me rack clear wort to the fermenter and leave the trub (a nice cone in the kettle) behind. If you don't care about settling, just run it off at that point.
I used to keep several counter-flow and convoluted counter-flow chillers in my brewshed, but I got rid of them. I can't see any reason to use them anymore.
What about whirlpool hopping?
When I first put up this page, late hopping mostly meant additions in the last few minutes of the boil. In the years since, whirlpool or "hop stand" additions have become central to hop-forward beer (especially the hazy IPAs), and this setup happens to be ideal for them. The pump is already moving the entire wort in a circle, so you are set up to add hops after flameout and hold them at whatever temperature you choose.
The method is simple. At the end of the boil, run the chilling water just long enough to bring the wort to your stand temperature, shut the water off, drop in your whirlpool hops, and keep the pump recirculating for 20 to 30 minutes before you finish chilling. A warmer stand near 185 to 190°F (85 to 88°C) still isomerizes a fair amount of alpha acid, so you pick up some bitterness along with the oils; a cooler stand around 160 to 170°F (71 to 77°C) gives you big flavor and aroma with very little added bitterness, since isomerization falls off quickly once you are below about 180°F (82°C). Because this rig lets you stop chilling at any temperature and hold it there, you have precise control over exactly where in that range you land. I go deeper on getting the most out of late and whirlpool hops in The Secret to Big Hop Aroma and Flavor.
The build, photo by photo



Has anyone else tried this?
Yes, lots of folks have emailed me with great results. For example, Michael wrote:
It's been a few months since I told you that I thought the Whirlpool Immersion Chiller (WIC) was the best thing since sliced bread. I'm still using rock salt with your design for chilling to lager temps, but have eliminated that step on ales. It's plenty fast without rock salt if I'm chilling to ale temps for 5-gallon batches. I took a 5-gallon batch from flame-out to 65°F in 5 minutes this past Saturday. Wow!
The best news: my American IPA won 3rd Best of Show at the Chicago Beer Society's Spooky Brew competition. My APAs and American IPAs are incredible now that I'm using the WIC. Unbelievable flavor and aroma from all of my late hop additions. Afterwards, Randy Mosher came up and told me how impressed the BOS judges were with the hop flavor. I was stunned to hear those words from a legend. Thank you for sharing your ideas through the mrmalty website.
That's a great story, and it makes the time spent putting up these pages worth it. It's really neat to share a little information and help a brewing brother or sister make better beer. Very cool.